
BLOG
Vacuum Membrane Press Table Size: Maximum Output, Minimum Foil Consumption
Vacuum Membrane Press Table Size: Maximum Output, Minimum Foil Consumption
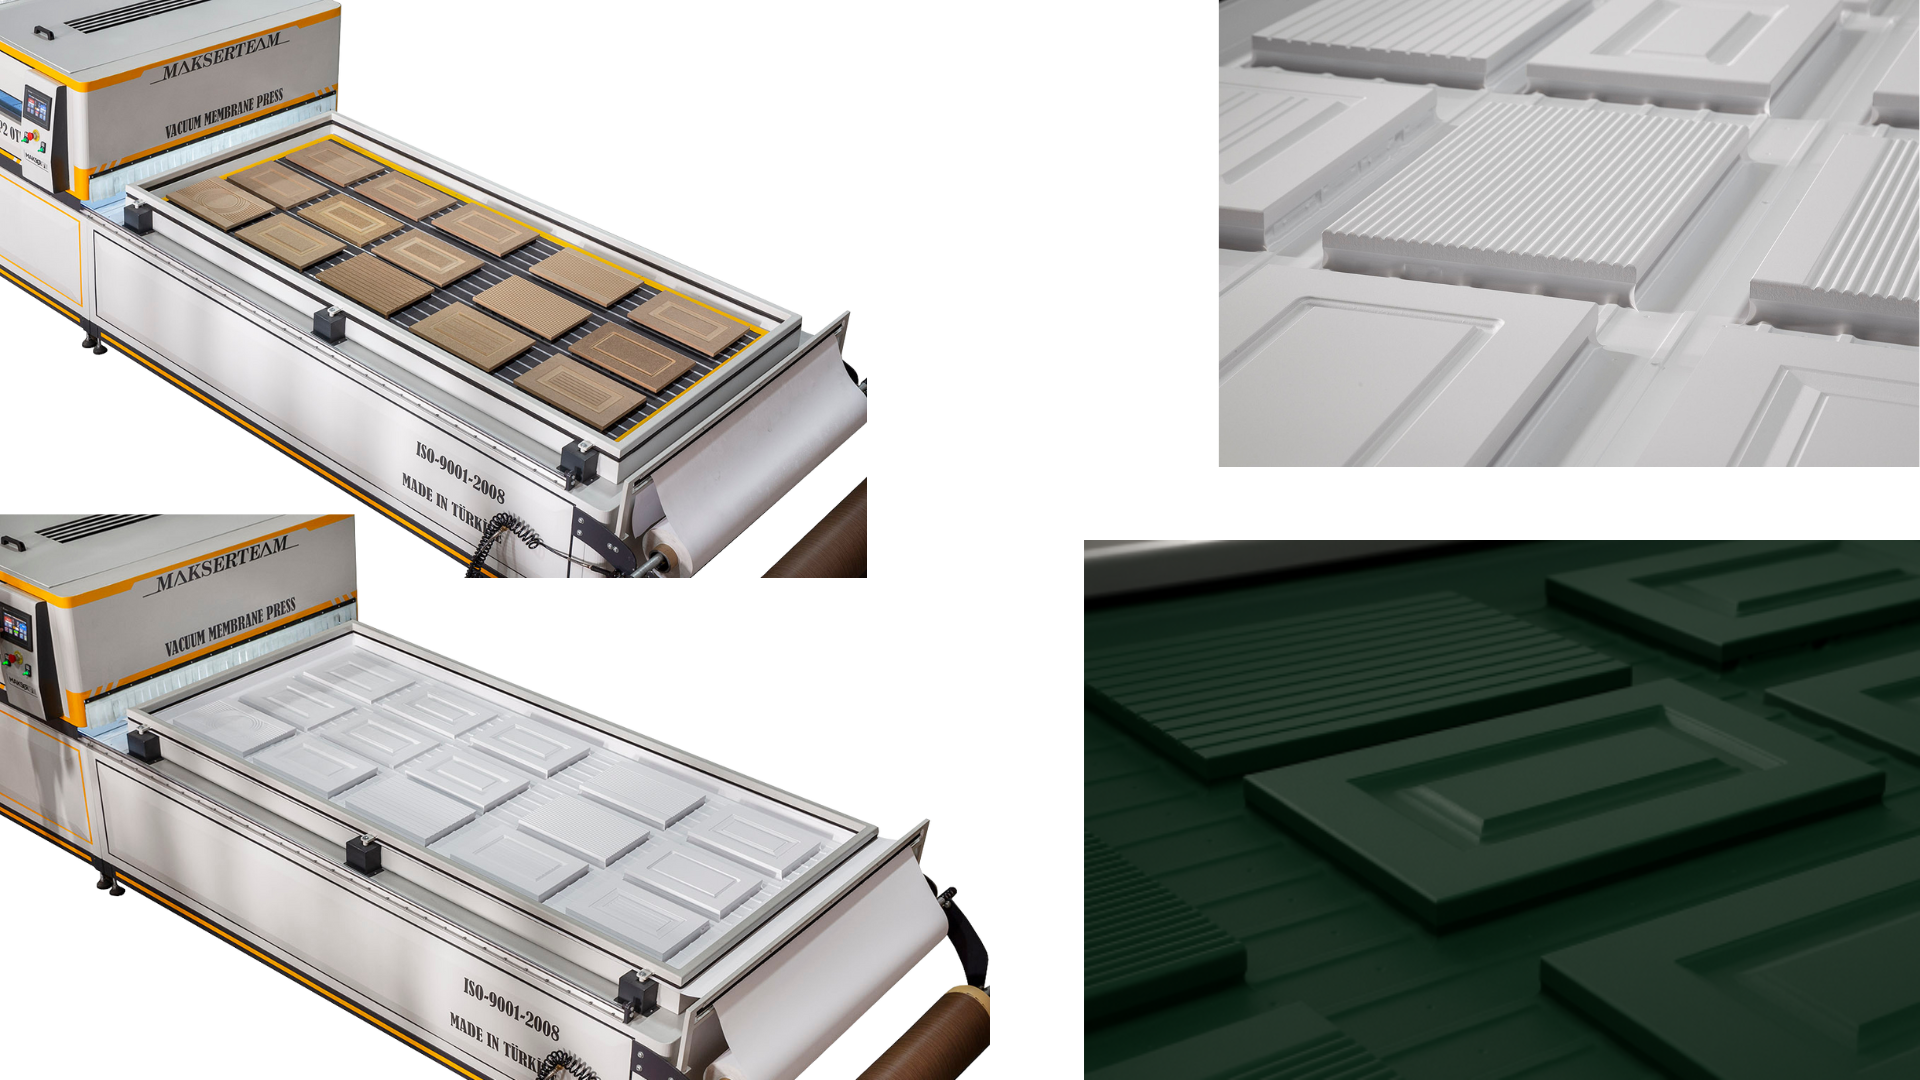
At first glance, vacuum membrane press table size may seem like a small detail in membrane doors, interior door skins,
and 3D decorative panels. In reality, table dimensions are one of the most critical parameters that determine
line profitability—right alongside machine build quality, heating performance, and vacuum pump strength.
In this article, we explain our approach to vacuum press table dimensions and how they affect:
- PVC foil consumption
- Scrap rate (rejects and rework)
- Real cycle capacity (not just “on-paper” capacity)
Related reading (internal links):
Membrane cabinet doors explained and
How vacuum pressing works.
Why Vacuum Membrane Press Table Size Matters
PVC foil is a high-cost input in furniture and door manufacturing. A poorly chosen
vacuum membrane press table size often results in:
- Unnecessary foil overconsumption
- Higher scrap rates
- Production far below the machine’s “advertised” capacity
The right table size = less foil + less scrap + more predictable cost per part.
That’s why table dimensions should be calculated technically—never based on guesswork—especially when
buying a new vacuum press or redesigning a production line.
Vacuum Press Table Width Based on PVC Foil Widths
In practice, PVC foils used in furniture and doors are commonly supplied in widths such as:
- 1,400 mm
- 1,200 mm
Rule: Match Maximum Table Width to Your Widest Foil
If the widest PVC foil you run is 1,400 mm, then the maximum practical table width should be 1,400 mm.
Technical reason: sealing and clamping must be complete
Foil must fully cover the vacuum zone, and the clamp frame must hold the foil wherever sealing is required.
If the table width exceeds foil width, you can end up with uncovered areas under the frame—creating vacuum leaks
and unstable forming pressure.
Economic reason: reducing waste and offcuts
A table width aligned with foil width typically:
- Improves nesting and placement speed
- Reduces leftover strips that cannot be reused efficiently
- Minimizes overall PVC foil consumption
For a general overview of PVC material properties, see:
polyvinyl chloride (PVC).
For standards and testing references, you can also consult:
ASTM International and
ISO.


Vacuum Membrane Press Table Length and Clearance Rules
When planning vacuum membrane press table dimensions, table length and layout clearances must match your job type.
In practice, two clearance rules are commonly used:
1) Edge-wrapped jobs (3D fronts, membrane doors, interior door panels)
For parts where the foil must wrap edges (edge return), use these minimum clearances:
- Part ↔ table edge: min. 60 mm (6 cm)
- Part ↔ part: min. 60 mm (6 cm)
These clearances help the foil turn comfortably around edges, reduce edge-lifting risk, and distribute tension more evenly.
2) Surface-only lamination (often 6–8 mm door skins)
If you are laminating only the face surface (no edge return), tighter spacing is possible:
- Part ↔ table edge: about 10 mm (1 cm)
- Part ↔ part: about 10 mm (1 cm)
For this job type, small clearances can still deliver high quality and allow much denser loading per cycle.
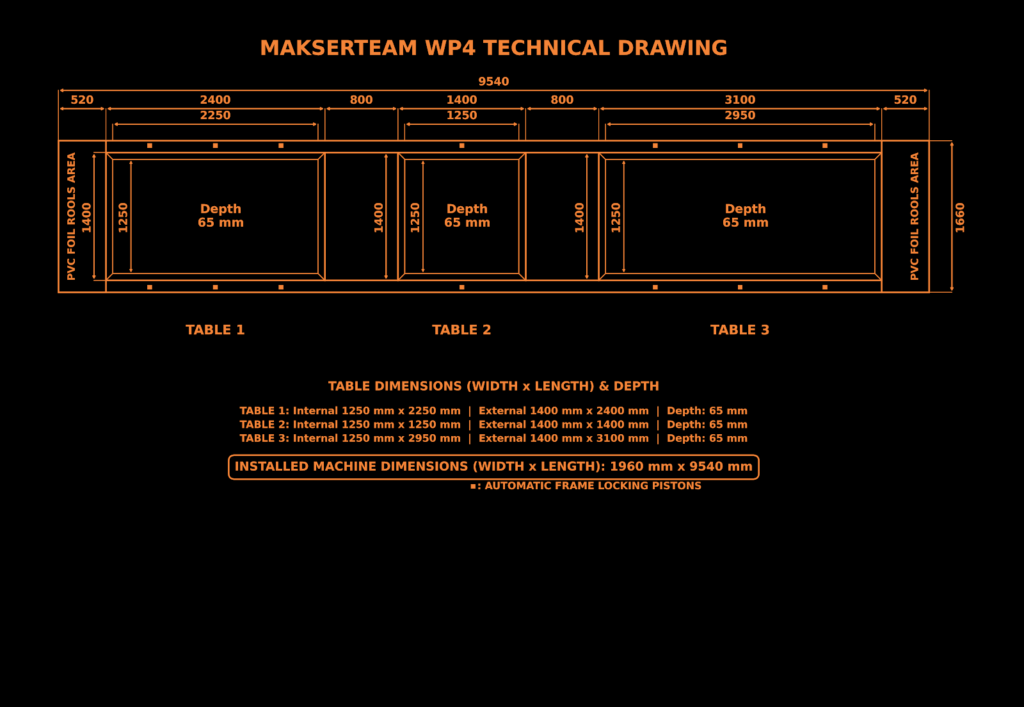
Vacuum Membrane Press WP4 Technical Drawings
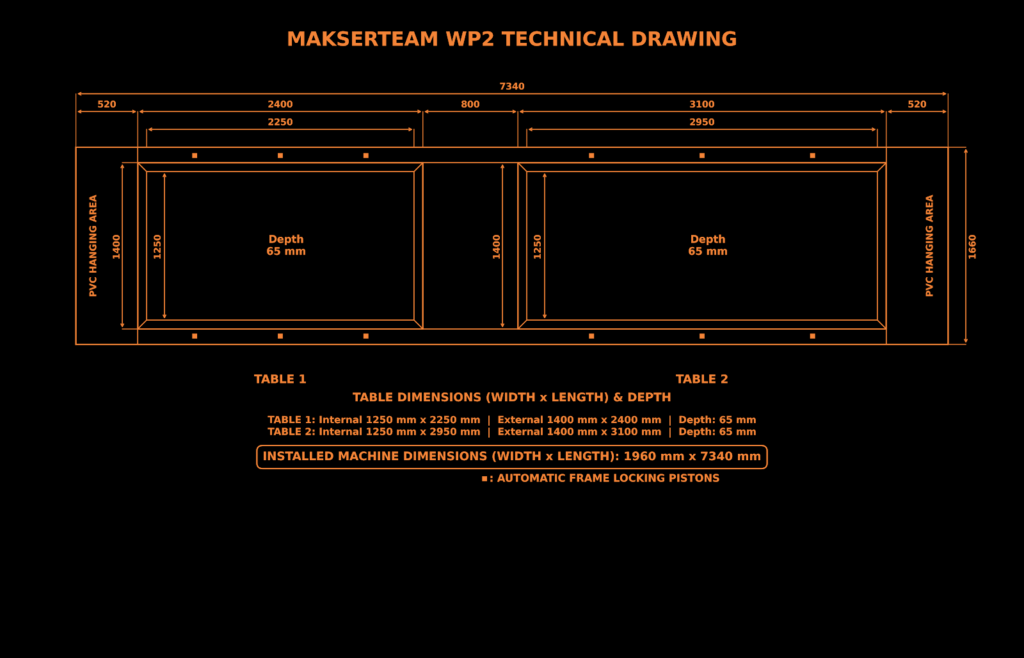
Vacuum Membrane Press WP2 Technical Draw
Vacuum Press Table Size for Interior Door Production
A common rule in interior door production is simple:
doors are typically loaded one by one rather than placing multiple doors side-by-side.
The table is usually designed around:
- PVC foil width (often 1,400 mm)
- One door face placed with correct clearances
Two practical foil usage models in door lines
Model 1 — Working with slit foil
- A 1,400 mm roll is slit to match the door face (e.g., 950 mm)
- Remaining strips are reused in other stations (casing, trims, profile wrapping)
Model 2 — Door face + trims in the same cycle
- Foil is used at full width (not slit)
- One door face is loaded together with trim/profile parts under the same foil
- Everything is pressed in one cycle
In both models, the goal is the same: use foil width and table area at maximum efficiency while minimizing unusable leftovers.
If you want a quick reference on the forming principle behind this process:
vacuum forming.
And for MDF basics:
MDF (medium-density fiberboard).
Capacity Example: 1,400 × 3,100 mm Table with 30 × 40 cm Fronts
This example shows how vacuum membrane press table size translates into real capacity once you include
usable working area and mandatory clearances.
Nominal outside table size
- 1,400 × 3,100 mm
Net usable working area (after bevel/frame)
- Approximately 1,250 × 2,950 mm
Part size
- 300 × 400 mm (30 × 40 cm)
Clearances (edge-wrapped job)
- Part ↔ table edge: 60 mm
- Part ↔ part: 60 mm
Loading across the width (1,250 mm)
3 parts wide:
- 3 × 300 = 900 mm
- 4 gaps (left + between + between + right): 4 × 60 = 240 mm
- Total: 900 + 240 = 1,140 mm → fits into 1,250 mm ✅
Result: maximum 3 parts across.
Loading along the length (2,950 mm)
Formula:
m × 400 mm + (m + 1) × 60 mm
For m = 6:
- 6 × 400 = 2,400 mm
- 7 × 60 = 420 mm
- Total: 2,820 mm → fits into 2,950 mm ✅
For m = 7:
- 7 × 400 = 2,800 mm
- 8 × 60 = 480 mm
- Total: 3,280 mm → exceeds 2,950 mm ❌
Result: maximum 6 parts along the length.
Total parts per cycle and net covered area
- Total parts per cycle: 3 × 6 = 18
- One part area: 30 × 40 = 1,200 cm²
- 18 parts area: 18 × 1,200 = 21,600 cm²
- 21,600 cm² = 2.16 m² net face area
This is a clear reminder: a table that “looks” like 1,400 × 3,100 mm on paper delivers realistic capacity only after
considering net working area and required clearances.
The Cost of Choosing the Wrong Vacuum Press Table Size
1) Higher PVC foil consumption
- Poor width/length combinations
- Unusable leftover strips
- Inefficient slitting and nesting plans
2) Higher scrap and rework rates
- Too-tight spacing → edge lifting, wrinkles, poor seating
- More rework → more foil + more time
- Inconsistent outcomes → unstable cost per part
3) Operating below real capacity
Relying on outside dimensions and assuming “a lot will fit” often leads to disappointment on the shop floor.
Real capacity must be calculated using:
net working area + part size + mandatory clearances.
Checklist: Questions to Answer Before Selecting Table Dimensions
When quoting or selecting a machine, we recommend defining table size by answering:
- What is your main product mix? (kitchen/bath fronts, doors, decorative panels)
- What are your most common panel dimensions?
- Which foil widths do you run? (1,400 mm / 1,200 mm etc.)
- Which job type is dominant? edge-wrapped vs. surface-only
- What is your output target? per day / per month (parts and m²)
With these inputs, you can select the vacuum membrane press table size that best matches your foil width,
product sizes, and capacity goals—without overbuying table area that increases waste.
Conclusion: The Right Table Size Lets You Control Cost from Day One
A vacuum membrane press table is not just a physical platform—it is a key driver of
foil consumption, scrap rate, and real production capacity.
- If your widest foil is 1,400 mm → your maximum table width should be 1,400 mm
- Edge-wrapped jobs typically require 60 mm clearances
- Surface-only lamination can often work with ~10 mm clearances
- Real capacity must be calculated from net working area + clearances (not outside dimensions)
When foil width, table size, clearances, and product mix are planned together, your line runs with:
less foil waste, less scrap, predictable costing, and stable repeatable quality.
Vacuum Membrane Press Table Size FAQ
Can I choose a table wider than my PVC foil?
In most setups, it creates sealing/clamping risks and increases waste. Matching table width to your widest foil typically
improves stability and efficiency.
Why does “net working area” matter more than outside dimensions?
Because clamp frames, bevels, and sealing zones reduce the usable area. The real number is always smaller than the machine’s
outside measurement.
What clearance should I use for edge-wrapped fronts?
A practical minimum is 60 mm between parts and around the table edge to support safe edge return and reduce lifting risk.